Menu Editor Guide
This guide covers how to configure each menu type, what every field in the inspector means, and the part people get stuck on most — display rules.
Just installed and want one working menu first? See Getting Started. Only interested in scripts? See Script Menus.
1. The interface
The main window has three tabs at the top: Context Menu, Status Bar Menu, and Plugin Manager. The first two are both menu editors and work identically — see section 6 for the differences.
Each editor has three panes:
| Pane | What it is | What you do here |
|---|---|---|
| Left: library | Every available menu template | Find what you want and add it |
| Middle: your menu | The actual contents of your Finder context menu | Reorder, nest, delete |
| Right: inspector | Every setting for the selected item | Title, icon, when it shows, how it runs |

All three dividers can be dragged to resize, and the widths are remembered. The window itself is resizable too.
What’s in the library
Grouped by function:
- New File — blank document templates: Markdown, Excel, AI, CSS and more
- Open With — open the selection in a specific app
- Favorites — jump straight to Downloads, Desktop, Documents…
- Copy To / Move To — send the selection to a location you use often
- Built-in — Copy Path, Cut, New Folder, Copy Filename, Paste Image as PNG, Calculate Total Size
- Scripts — ready-made scripts you can use as-is or edit
- Plugins — menus provided by installed plugins
The search box at the top filters by name.
Adding a menu item
Three ways, same result:
- Drag it from the left pane to the middle
- Double-click a template to append it to the end
- Right-click a template → Add to Menu
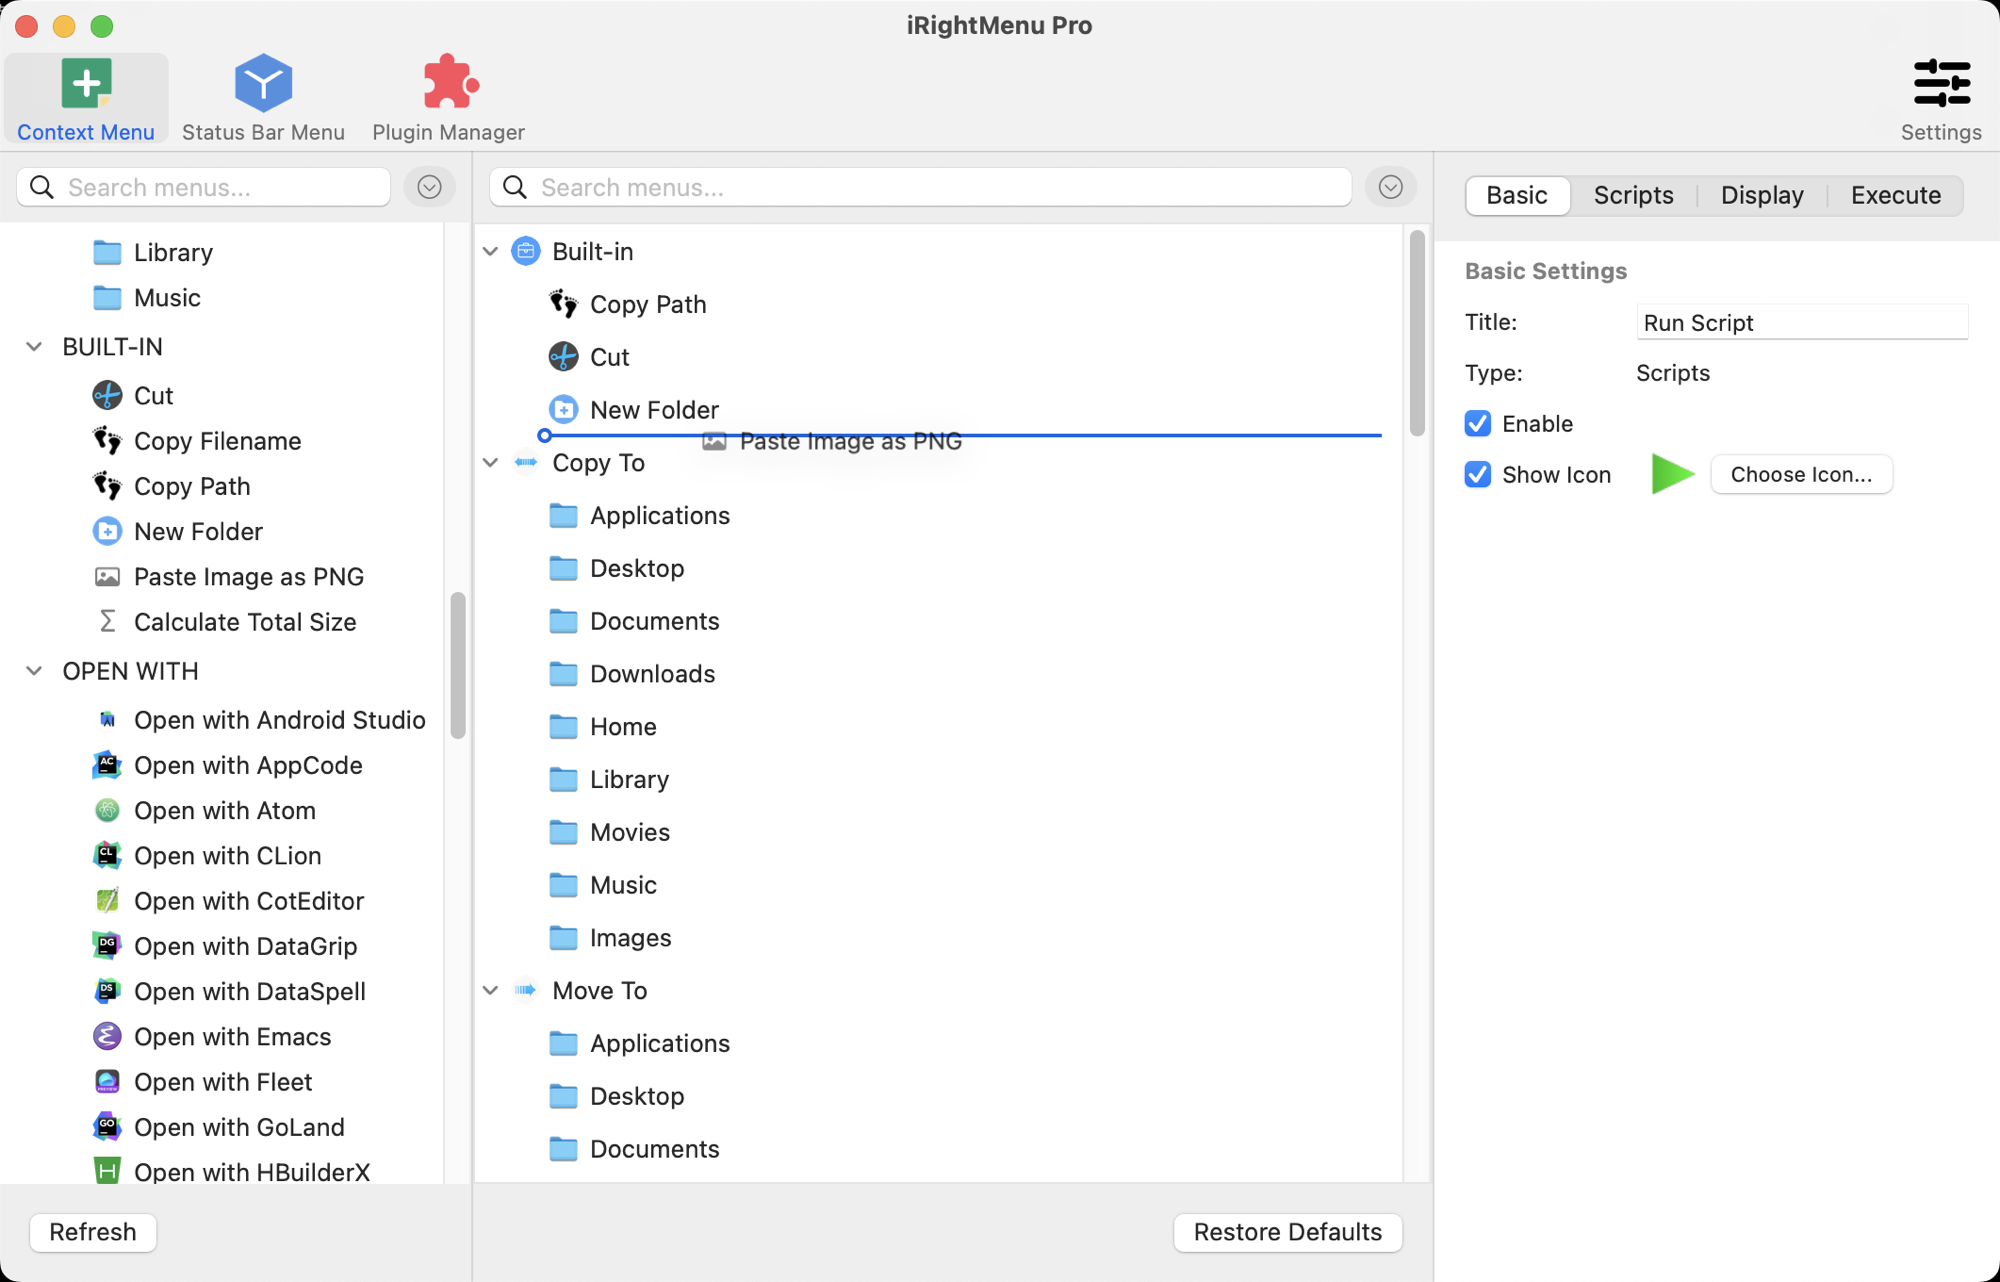
While dragging, a blue horizontal line in the middle pane shows where the item will land.
Creating one from scratch (no template)
Nothing in the library fits? Right-click in the middle pane → Add to create a blank one: New File, Copy To…, Move To…, Open Folder, Open With…, Scripts, Submenu, Separator.
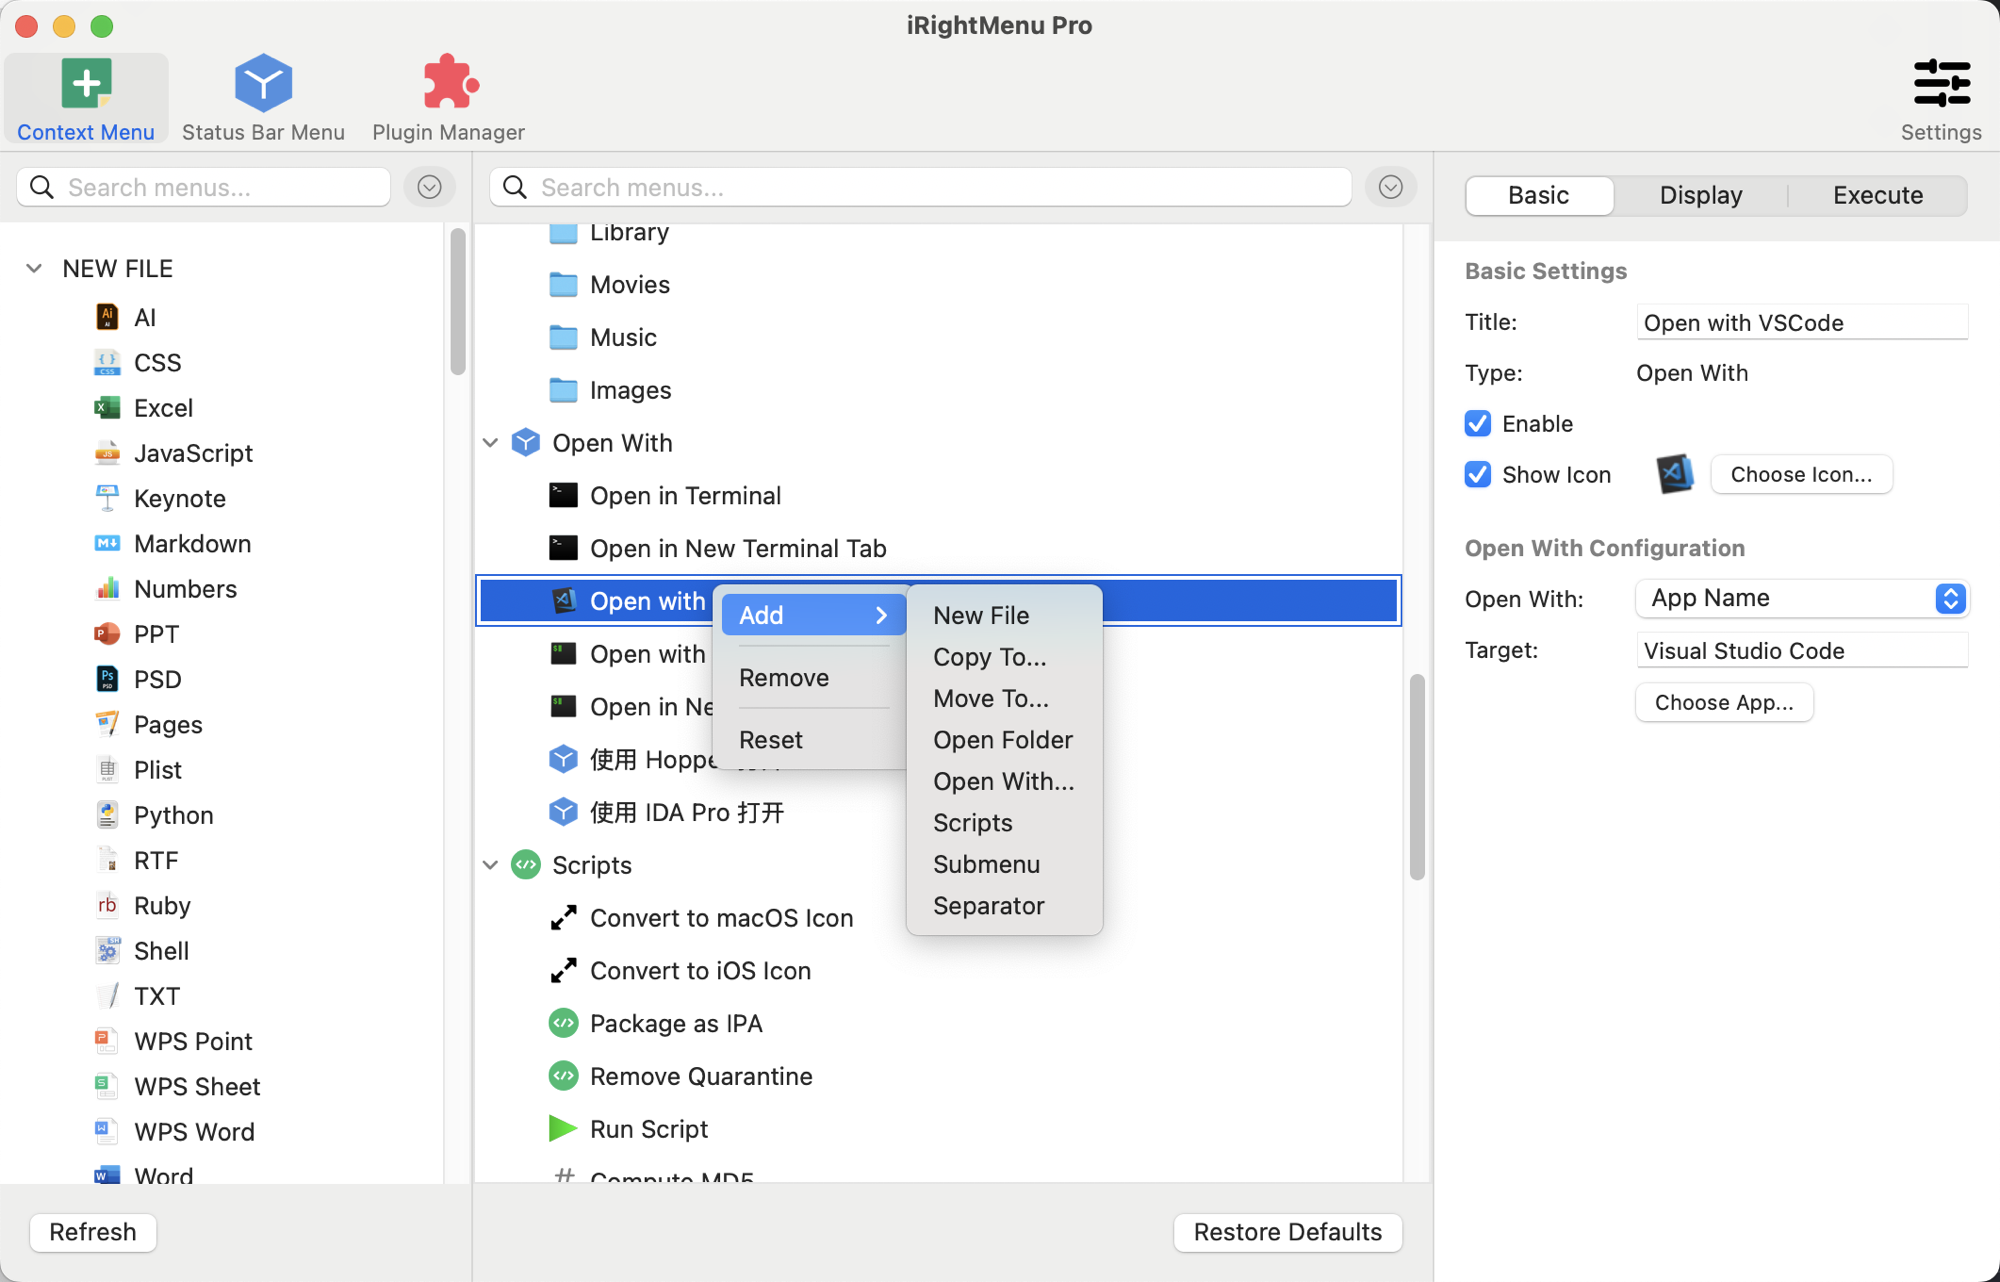
Where the new item lands depends on what you right-clicked:
| You right-clicked | The new item goes |
|---|---|
| A regular menu item | Below it, as a sibling |
| A submenu | Inside it, at the end |
| Empty space, nothing selected | End of the top level |
Right-clicking empty space does not clear the current selection. If an item was already selected, the new one still lands next to it — click empty space first to deselect.
The same context menu also has Remove and Reset. Reset only applies to items that came from the library; items you created yourself and group headers show it greyed out.
Reordering, nesting, deleting
- Reorder — drag up and down in the middle pane
- Nest — drop onto a Submenu item to make it a child
- New submenu — right-click in the middle pane → Add → Submenu
- Delete — select and press
Delete
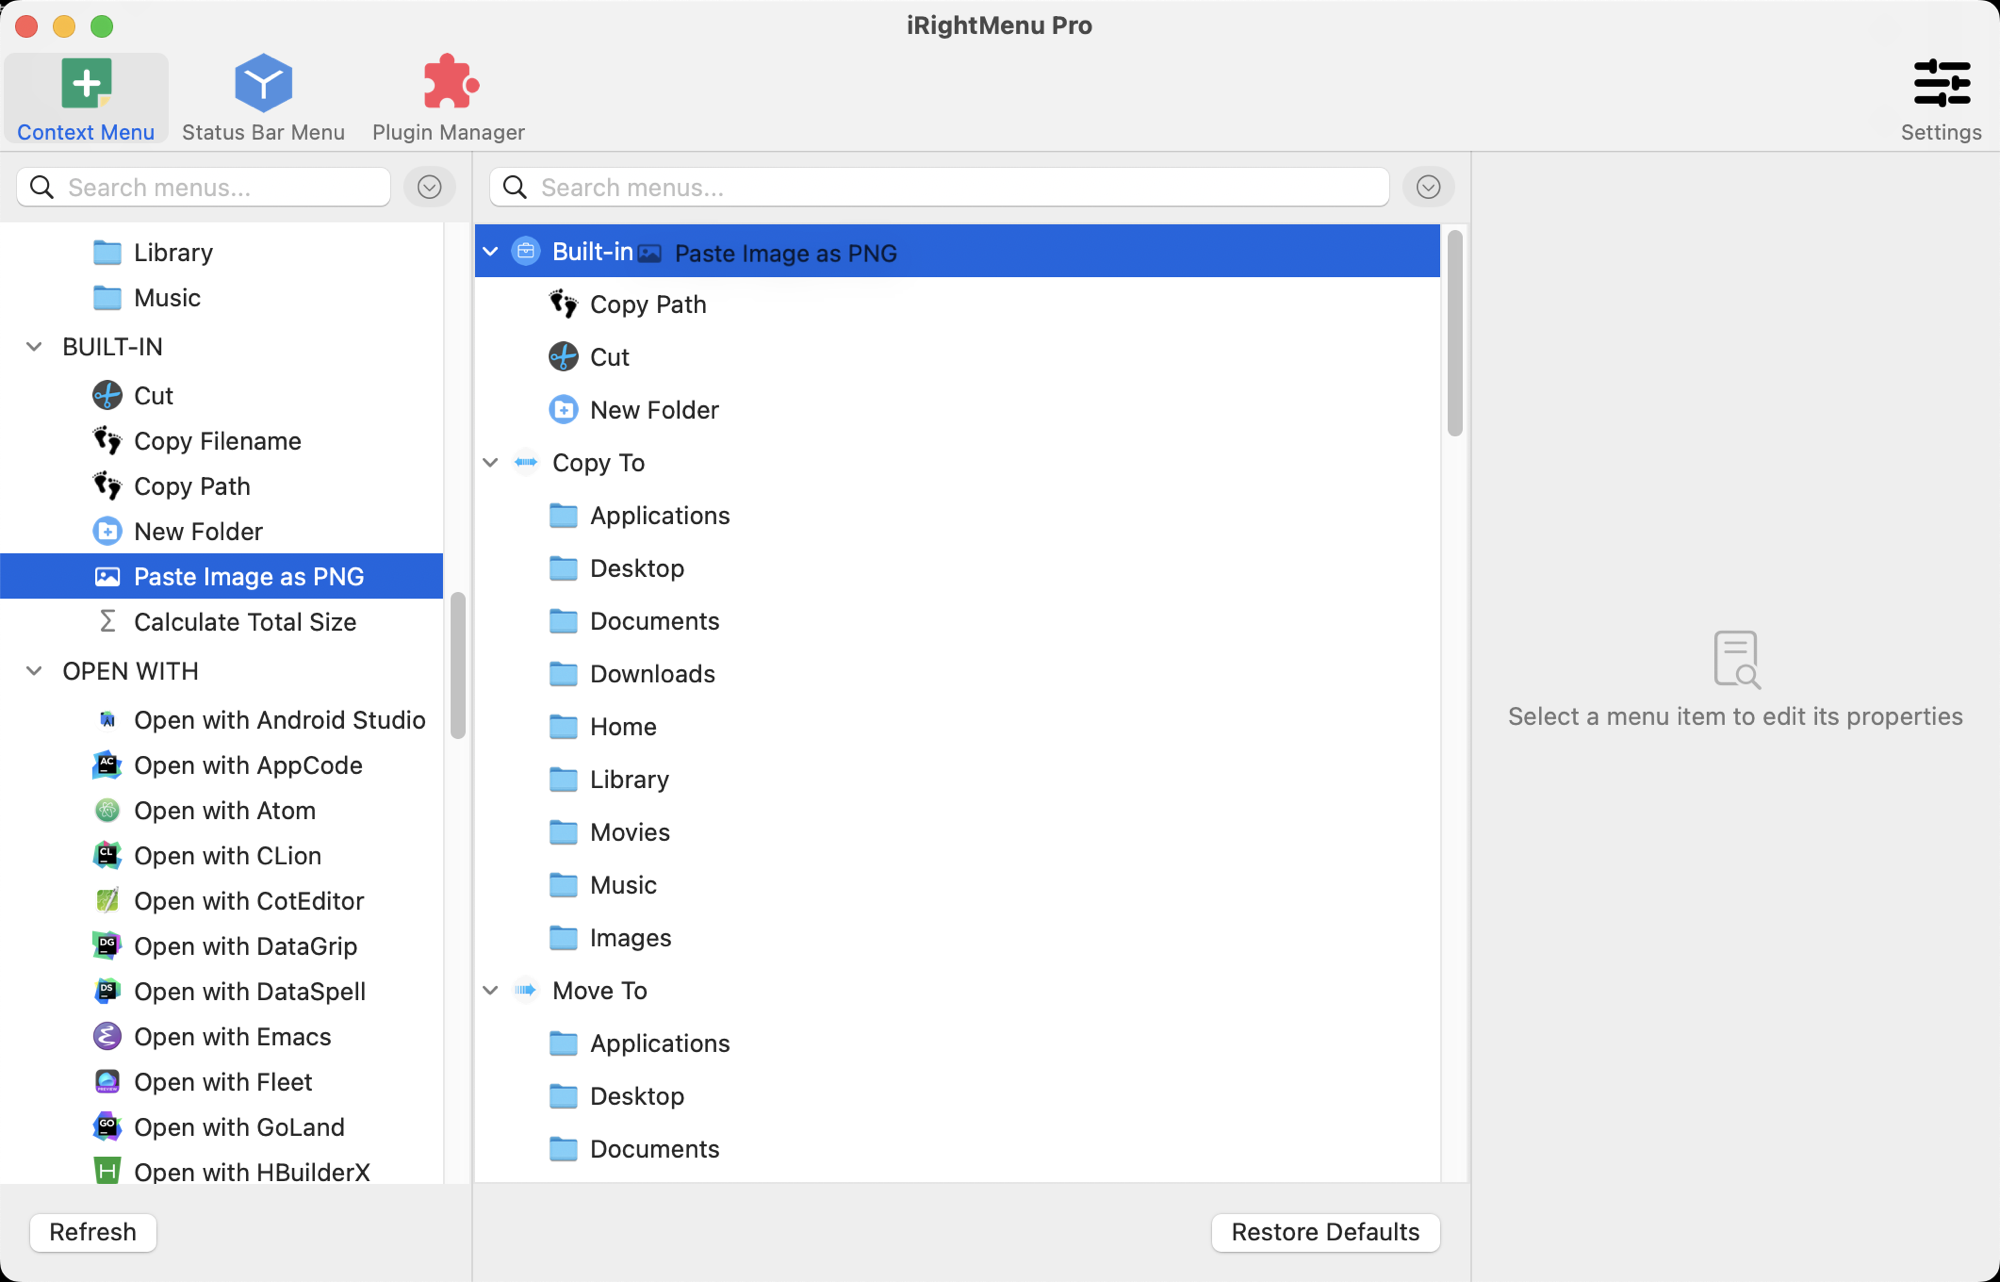
Two drop indicators, two meanings:
| What you see | On release |
|---|---|
| Blue line between two items | Inserted there, as a sibling |
| Target row fully highlighted | Dropped inside that item, as a child |
The highlighted row also shows the name of the item you are dragging, so you can confirm the target.
When changes take effect
Immediately. There is no Save button. As soon as you finish editing a field (text field loses focus, popup selected, checkbox clicked), the change is written and pushed to Finder.
Made a mistake? ⌘Z undoes, ⇧⌘Z redoes.
2. Building your first menu
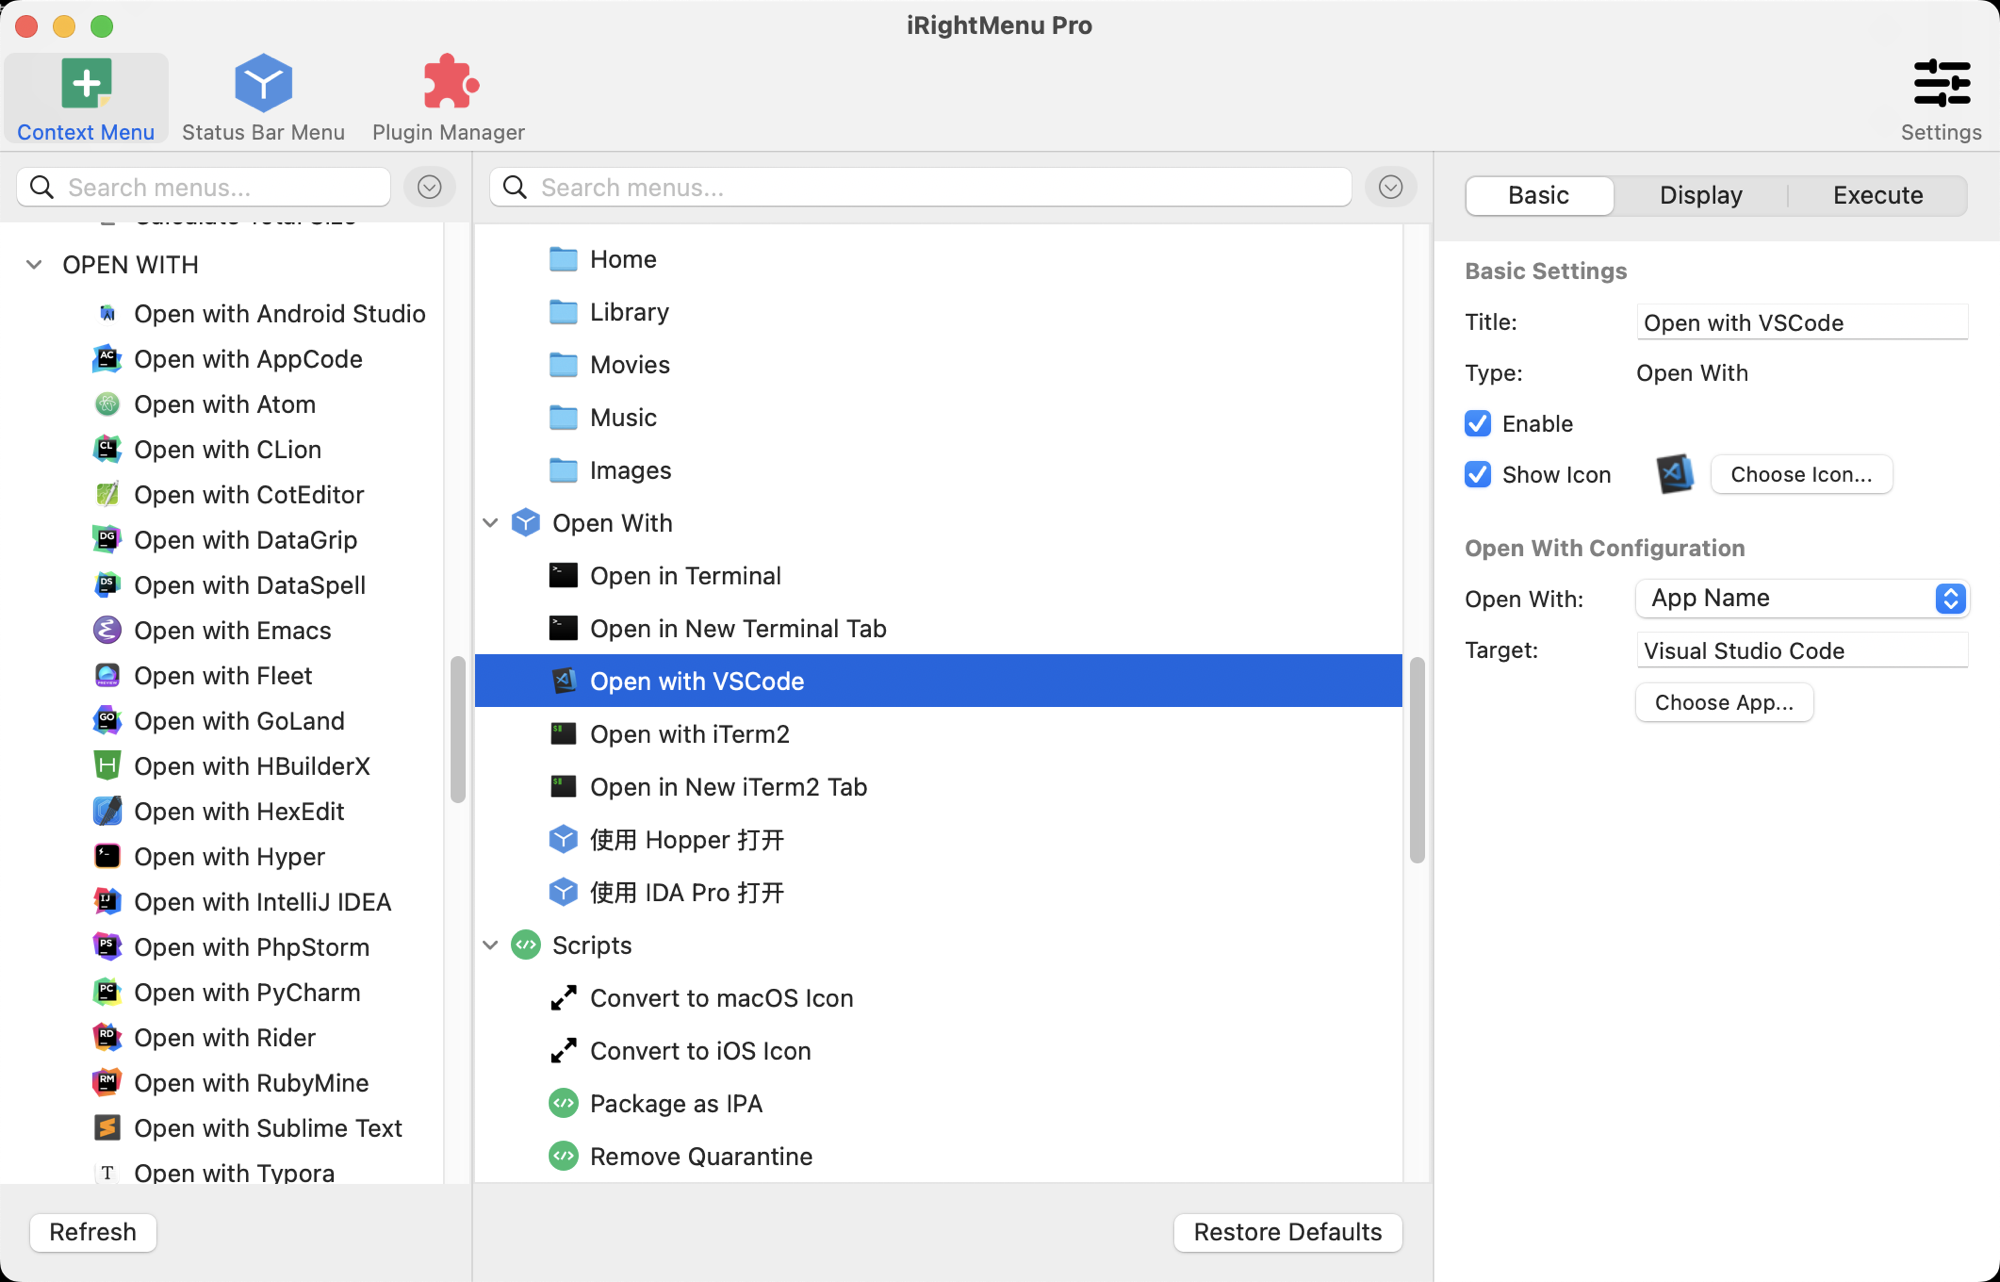
“Open with Visual Studio Code”, start to finish:
- Right-click in the middle pane → Add → Open With…
- The new item is called “Open With…”; on the Basic tab set Title to
Open with VS Code - Scroll to Open With Configuration:
- Set Open With to
App Name - Set Target to
Visual Studio Code— the name shown in the Applications folder, without.app
- Set Open With to
- Switch to the Display tab and set Show When to
Files selected - Done. Right-click any file in Finder to try it
The library does contain a whole group of ready-made “Open with X” entries you could drag over and just change the target. We create one from scratch here because it leaves every field for you to fill in — go through them once and you know what each one controls.
If the menu does not appear, see “The context menu doesn’t show up” in the FAQ.
3. Menu types
| Type | What it does | Must be set |
|---|---|---|
| New File | Creates a file of a given type in the current folder | File template |
| Built-in | Runs one built-in action | Nothing |
| Open With | Opens the selection in a specific app | Target app |
| Open Folder | Opens a folder in Finder | Target folder |
| Copy To / Move To | Copies or moves the selection to a folder | Target folder |
| Scripts | Runs your own script | Script content |
| Plugin | Calls a plugin feature | Nothing (the plugin decides) |
| Submenu | A container for other items | Nothing |
| Separator | A horizontal line for grouping | Nothing |
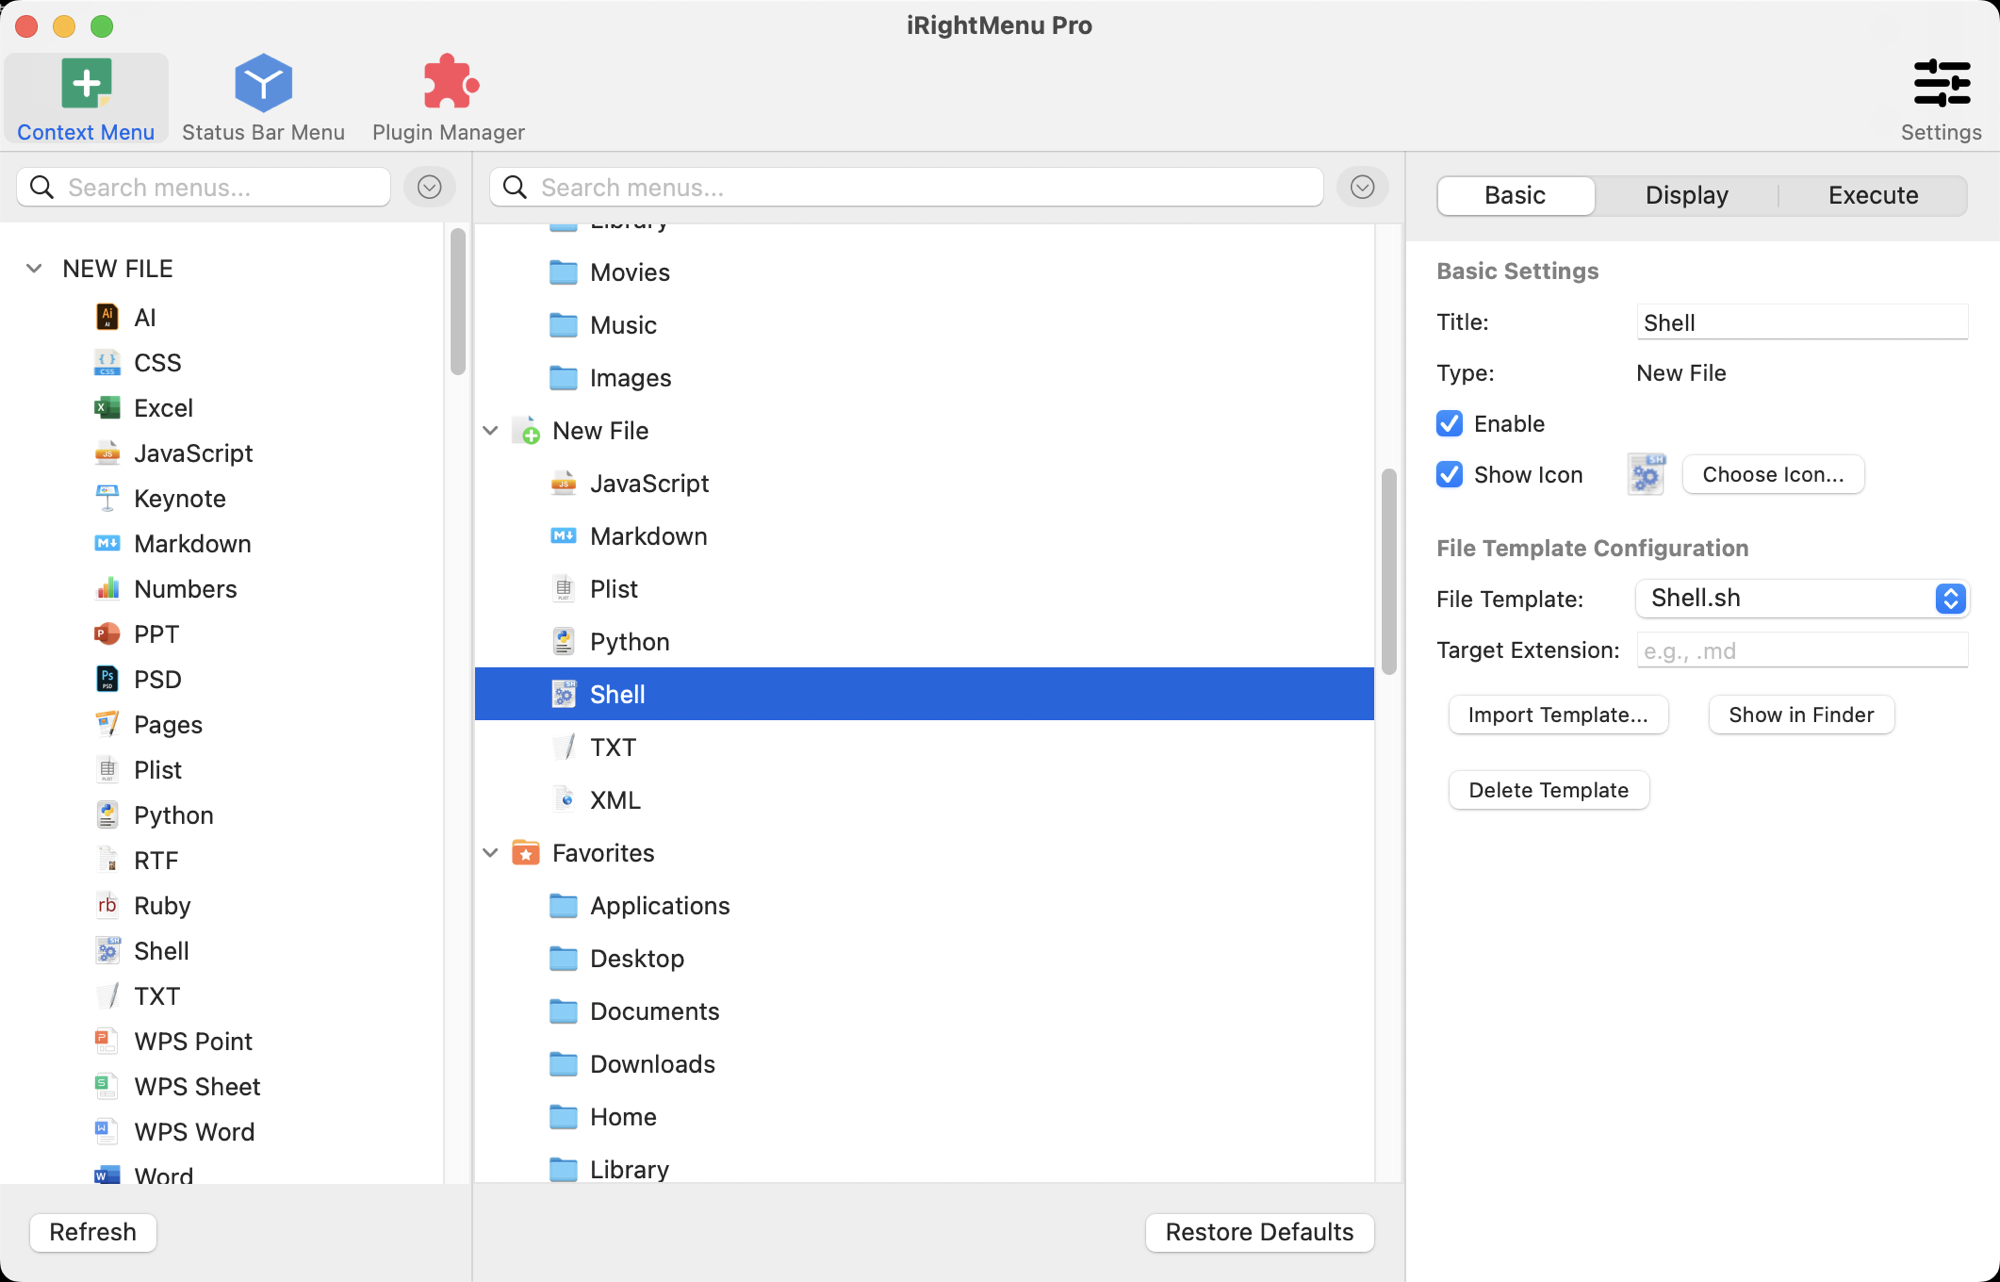
New File
Creates a new file in the current Finder folder.
- File Template — determines the initial contents. The popup lists every existing template (
Shell.sh,Markdown.mdand so on) - Target Extension — leave empty to use the template’s own extension; fill it in to override. If the template is
Markdown.mdand you entermdx, you get.mdx. The leading dot is optional — it is added for you - Open After Create (on the Execute tab) — opens the new file in the default app right away
The three buttons below:
| Button | What it does |
|---|---|
| Import Template… | Turns an existing file into a template. A Word file with your letterhead, a configured .gitignore, a script with a fixed header — set one up and import it. Importing fails if a file with the same name already exists |
| Reveal in Finder | Opens the templates folder. Go here to edit a template’s contents directly |
| Delete Template | Deletes the selected template file, after a confirmation prompt |
Built-in
Six actions that need no configuration:
| Name | What it does |
|---|---|
| Copy Path | Copies the full path of the selection to the clipboard |
| Copy Filename | Copies just the file name, extension included |
| Cut | Cuts, so you can paste elsewhere |
| New Folder | Creates a folder in the current directory |
| Paste Image as PNG | Saves the clipboard image as a PNG in the current folder |
| Calculate Total Size | Reports the total size of the selection |
Open With
Open With decides how Target is interpreted:
| Open With | Target | Example |
|---|---|---|
| App Name | The name shown in the Applications folder, without .app |
Visual Studio Code |
| Bundle ID | The bundle identifier | com.microsoft.VSCode |
| App Path | The full path | /Applications/Visual Studio Code.app |
| System Service | The service name, as it appears in the Services menu | Open in Terminal |
The Choose App… button below Target picks from your installed apps, so you neither type it out nor get it wrong.
Open each file separately (on the Execute tab) — with several files selected, launch a separate instance for each. Almost no app needs this, since most accept multiple files at once; it exists for older programs that only handle one document at a time. It does not apply to System Service and is hidden in that case.
Open Folder / Copy To / Move To
All three need a Target Folder — use the button to pick a directory.
- Open Folder — opens that folder in Finder, regardless of what is selected
- Copy To / Move To — sends the selection there
- Reveal in Finder (on the Execute tab) — jumps to the target folder and highlights the result when finished
Scripts
The most flexible type. See Script Menus for the full picture; here are the three fields on the Scripts tab:
- Interpreter — what runs the script. A command name (
bash,zsh,python3,node) or a full path (/opt/homebrew/bin/python3) - Environment Variables — one
KEY=VALUEper line. Leave empty for the system defaults. Most often used to extendPATH:
  PATH=/opt/homebrew/bin:/usr/local/bin
  LANG=en_US.UTF-8
- Script Content — the script itself. Selected file paths arrive as
$1,$2… and the working directory is set to the current Finder folder
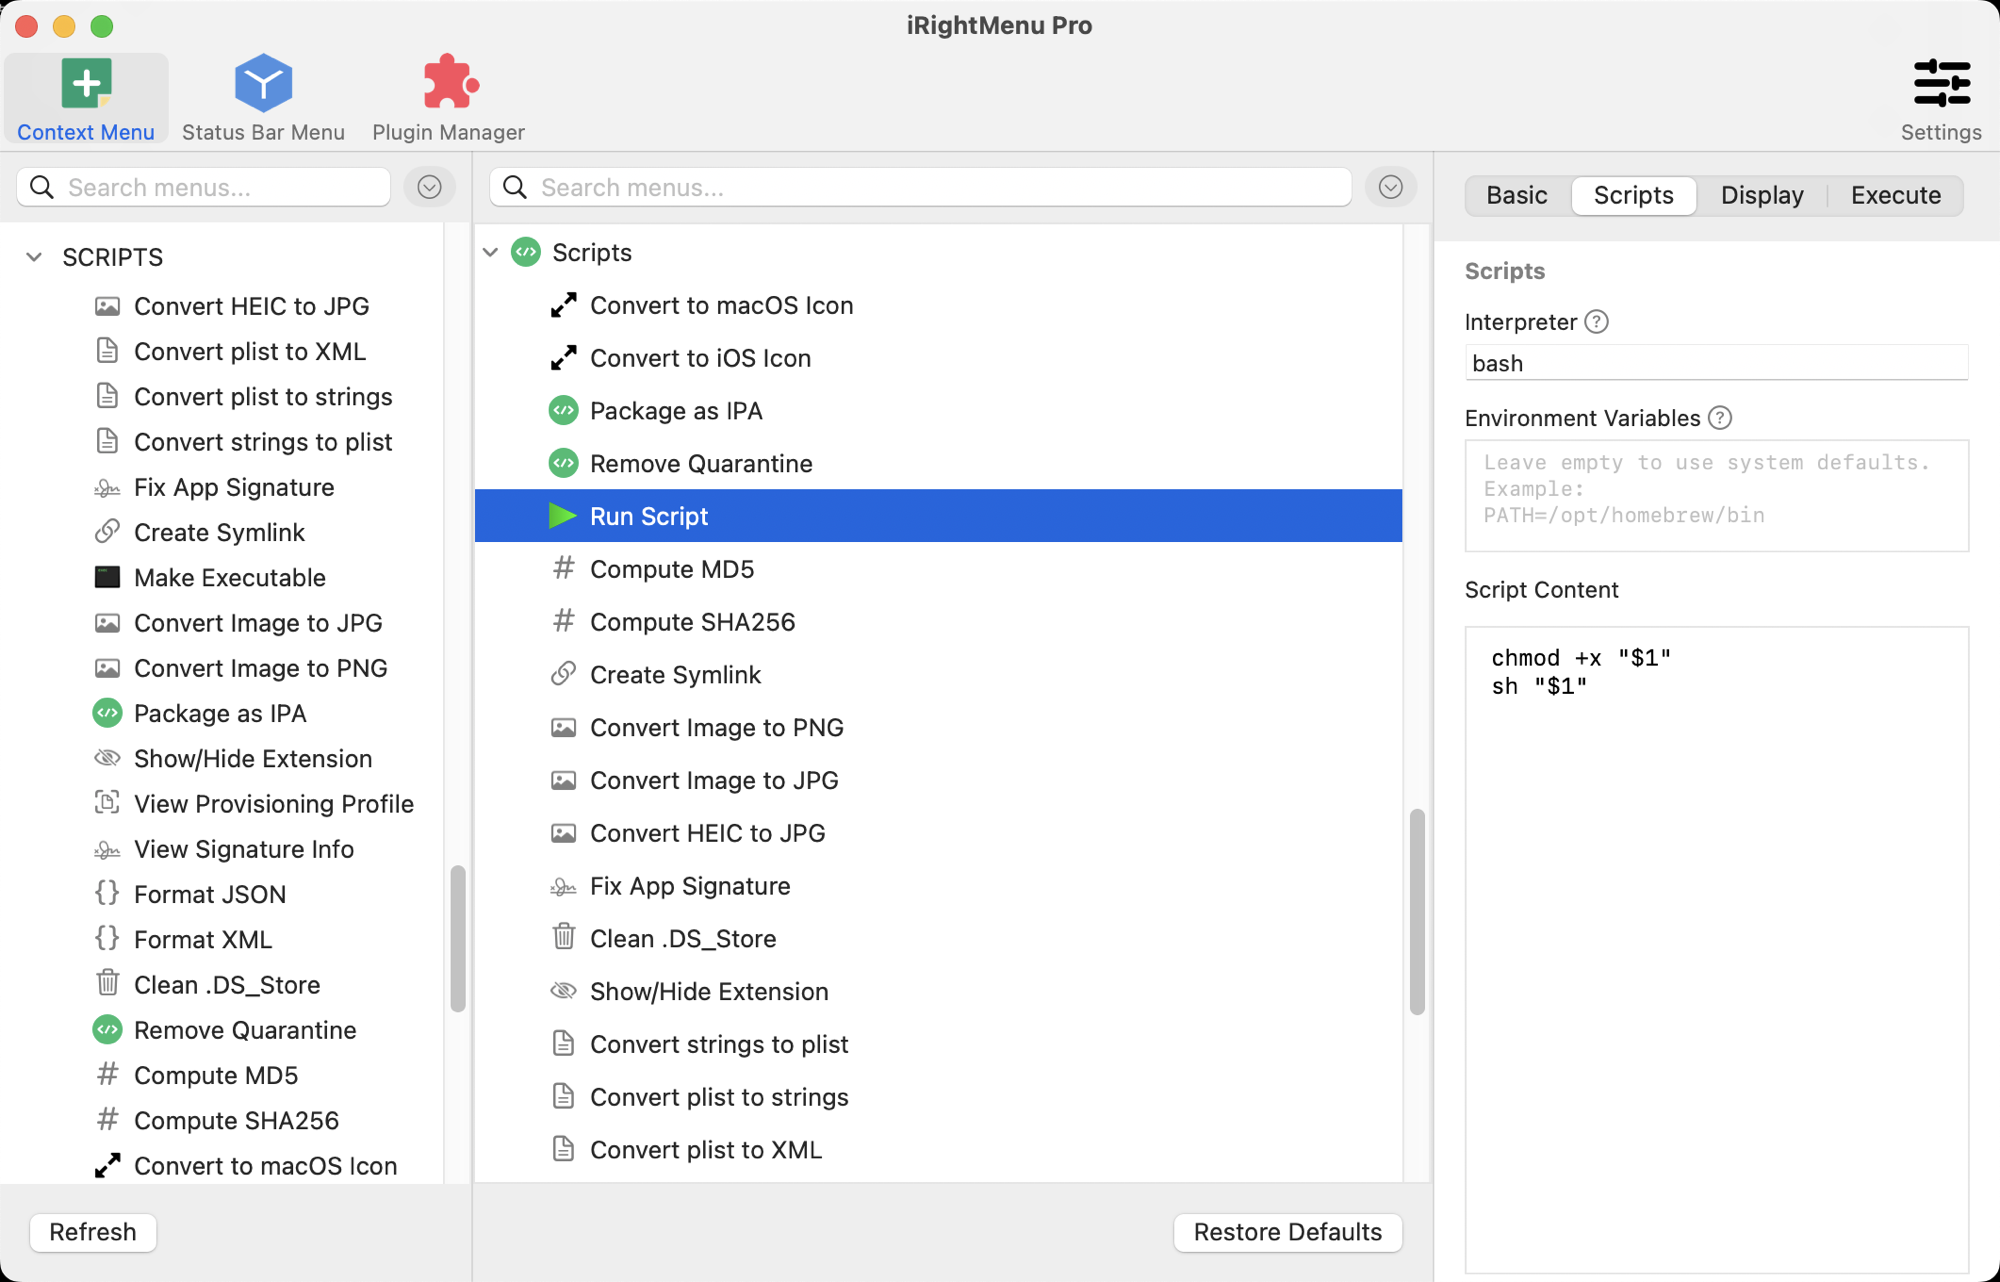
Note that this tab only exists for the Scripts type — the tab bar reads Basic / Scripts / Display / Execute, four tabs, where other types have three.
The ⓘ next to Interpreter and Environment Variables opens an inline explanation, so you don’t have to come back here.
Plugin
Provided by a plugin; the title and icon follow the plugin. The top of the inspector shows From Plugin: <name>, and Manage this plugin… jumps to the Plugin Manager.
You can still give it its own display rules and execution settings — those are yours and survive plugin updates.
Submenu and Separator
- Submenu — a pure container. No Display or Execute tab, because it does nothing itself
- Separator — a horizontal line. Always shown, unaffected by any rule
4. Inspector fields
The inspector has up to four tabs, depending on the menu type:
| Tab | When it appears |
|---|---|
| Basic | Always |
| Scripts | Scripts type only |
| Display | Everything except Submenu and Separator |
| Execute | Everything except Submenu and Separator |
Basic
| Field | Notes |
|---|---|
| Title | The text shown in the menu |
| Type | Read-only. The type is fixed when the item is added and cannot be changed — delete and re-add to switch |
| Enable | Turn off to hide the item without losing its configuration |
| Show Icon | Turn off for text only |
| Icon | Choose Icon… picks a built-in icon or a local image file. Local images are scaled down automatically, so a large file will not slow the menu down |
| Shortcut | Status Bar Menu only, under UI Configuration. Click the field and press the combination. The context menu has no equivalent — Finder’s context menu does not accept custom shortcuts |
Display
This is the tab worth understanding. It decides when the item appears.
Show When
A single popup that acts as the master switch for every rule below it:
| Option | When the item appears |
|---|---|
| Always | No matter what is selected — including nothing at all (right-clicking empty space) |
| Files selected | Only when the selection contains files that satisfy the file conditions |
| Folders selected | Only when the selection contains folders that satisfy the folder conditions |
| Files or folders selected | When either the file conditions or the folder conditions are satisfied |
Three things to know:
- With Always, none of the file or folder conditions apply. If you want to filter by extension, do not choose Always
- Right-clicking empty space in Finder shows only Always items. Menus like Copy Path, which need a selection, will not appear — that is correct behaviour
- File conditions and folder conditions are OR’d, not AND’d. With “Files or folders selected”, satisfying either side is enough
File conditions
| Field | Notes |
|---|---|
| Name Match | No Restriction / Extension / Regular Expression |
| Patterns | The patterns to match. Add as many as you like — matching any one of them counts |
| Requires execute permission (+x) | Only show for files with the execute bit set. Useful for “Run in Terminal” style menus |
| Min / Max Selection | How many files may be selected. 0 means no limit |
Entering extensions: one at a time. The leading dot and the letter case are both optional — jpg, .jpg, JPG and .JPG all normalise to jpg, and the list always shows the lowercase dotless form. Adding the same extension twice is ignored.
The dialog behind + adapts to your Name Match choice, giving the right explanation and example for extensions or for regular expressions.
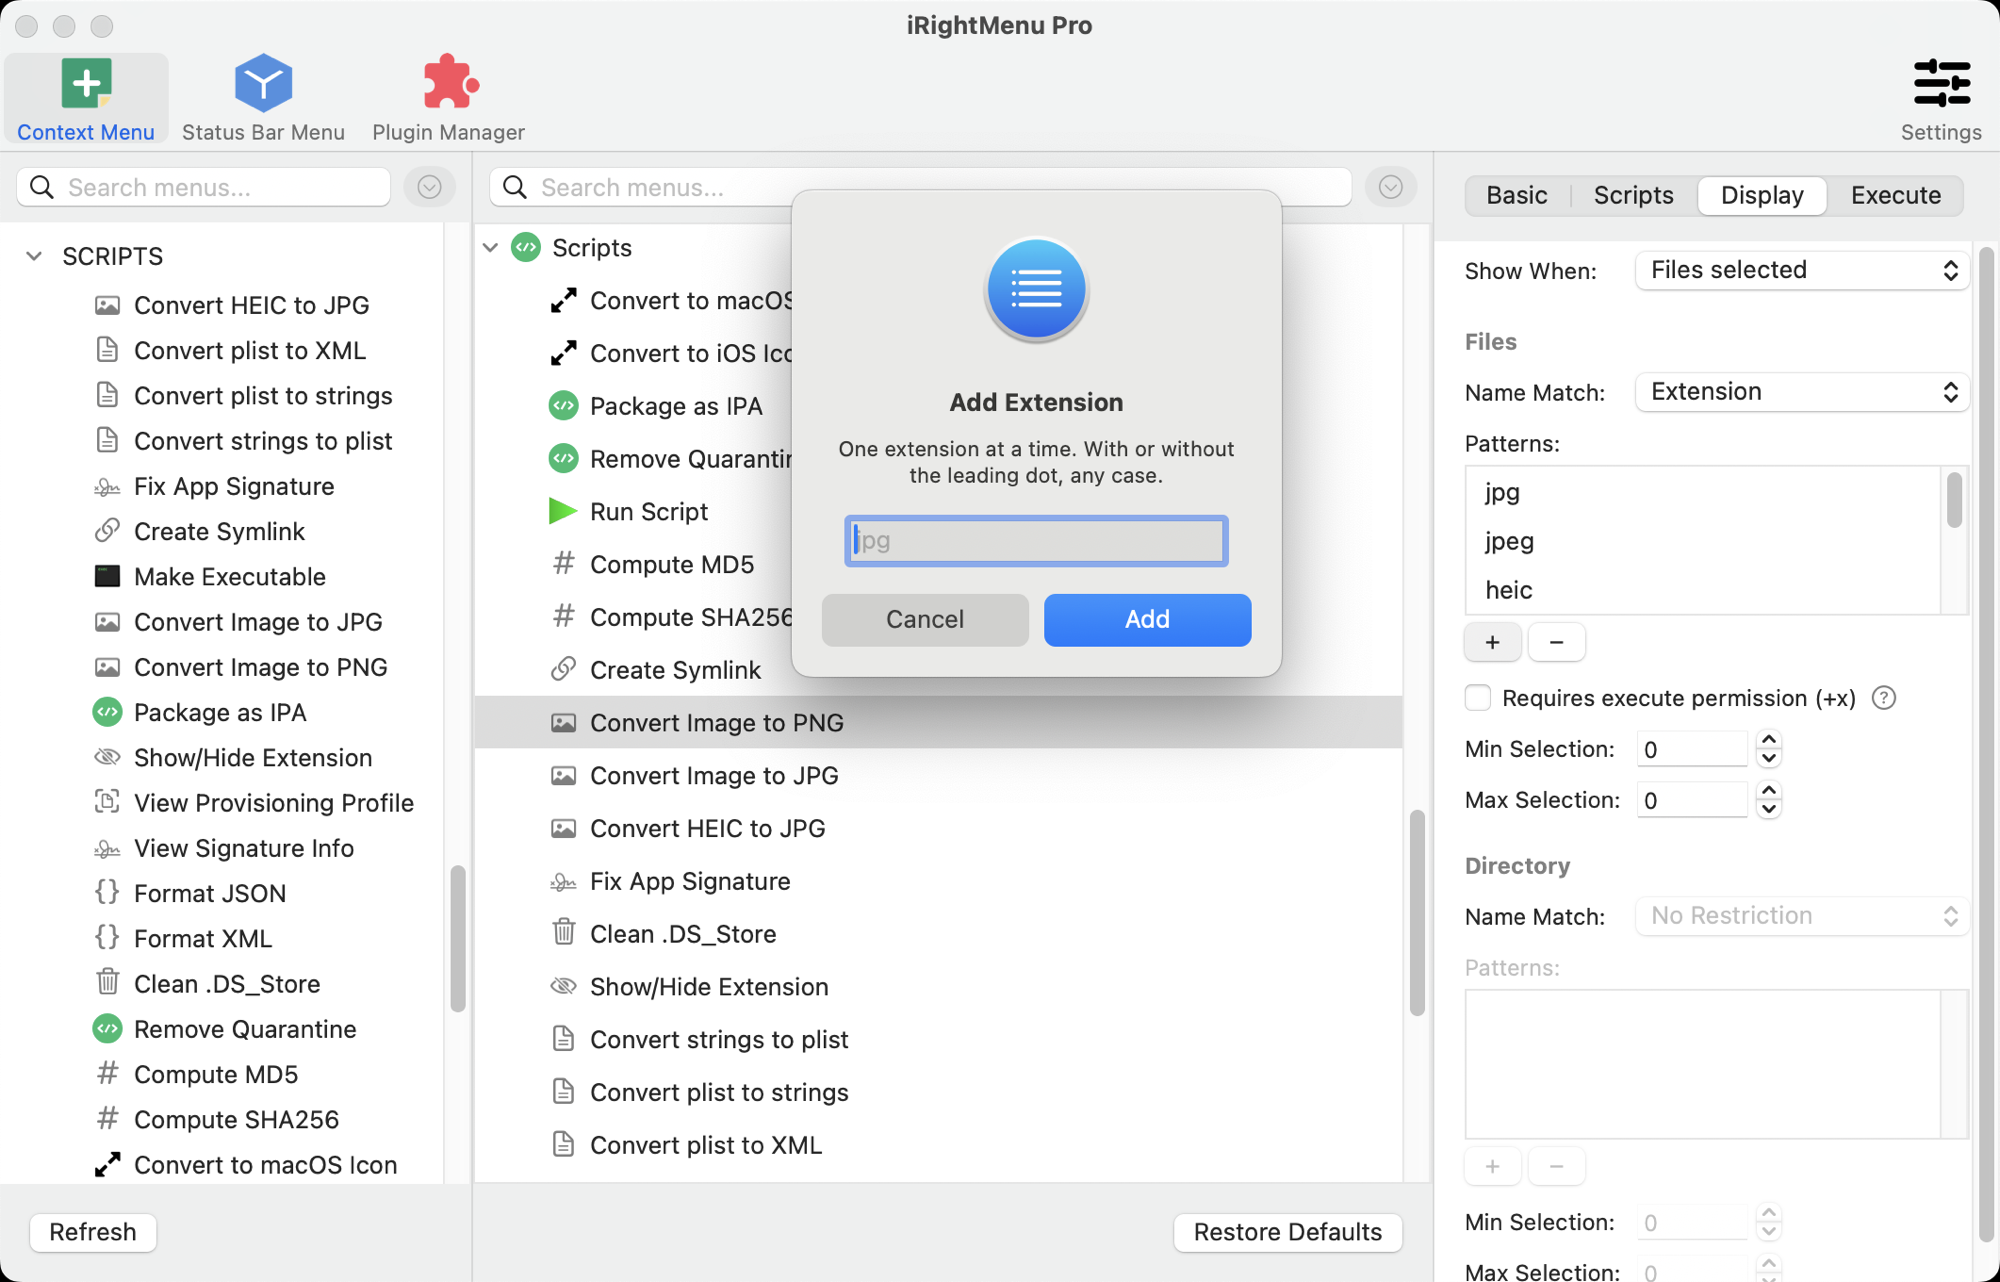
Using regular expressions: matched against the file name only, not the path, and it is a partial match — any part of the name matching is enough. ^IMG_ catches everything starting with IMG_; \.tar\.gz$ catches .tar.gz files.
Min and Max are easy to misread: they count what is left after the earlier conditions have filtered, not the total number of items you selected.
Example: the menu matches extension
jpgwith Max Selection 1. You select 3 files, only one of which is a JPG. One JPG survives the filter, which satisfies “at most 1”, so the menu appears.
Folder conditions
The same as file conditions, minus “Requires execute permission”.
Extension here means the folder’s own extension — on macOS, .app, .xcodeproj, .bundle and .framework are all folders. To target Xcode projects, choose Extension and enter xcodeproj; no regular expression needed.
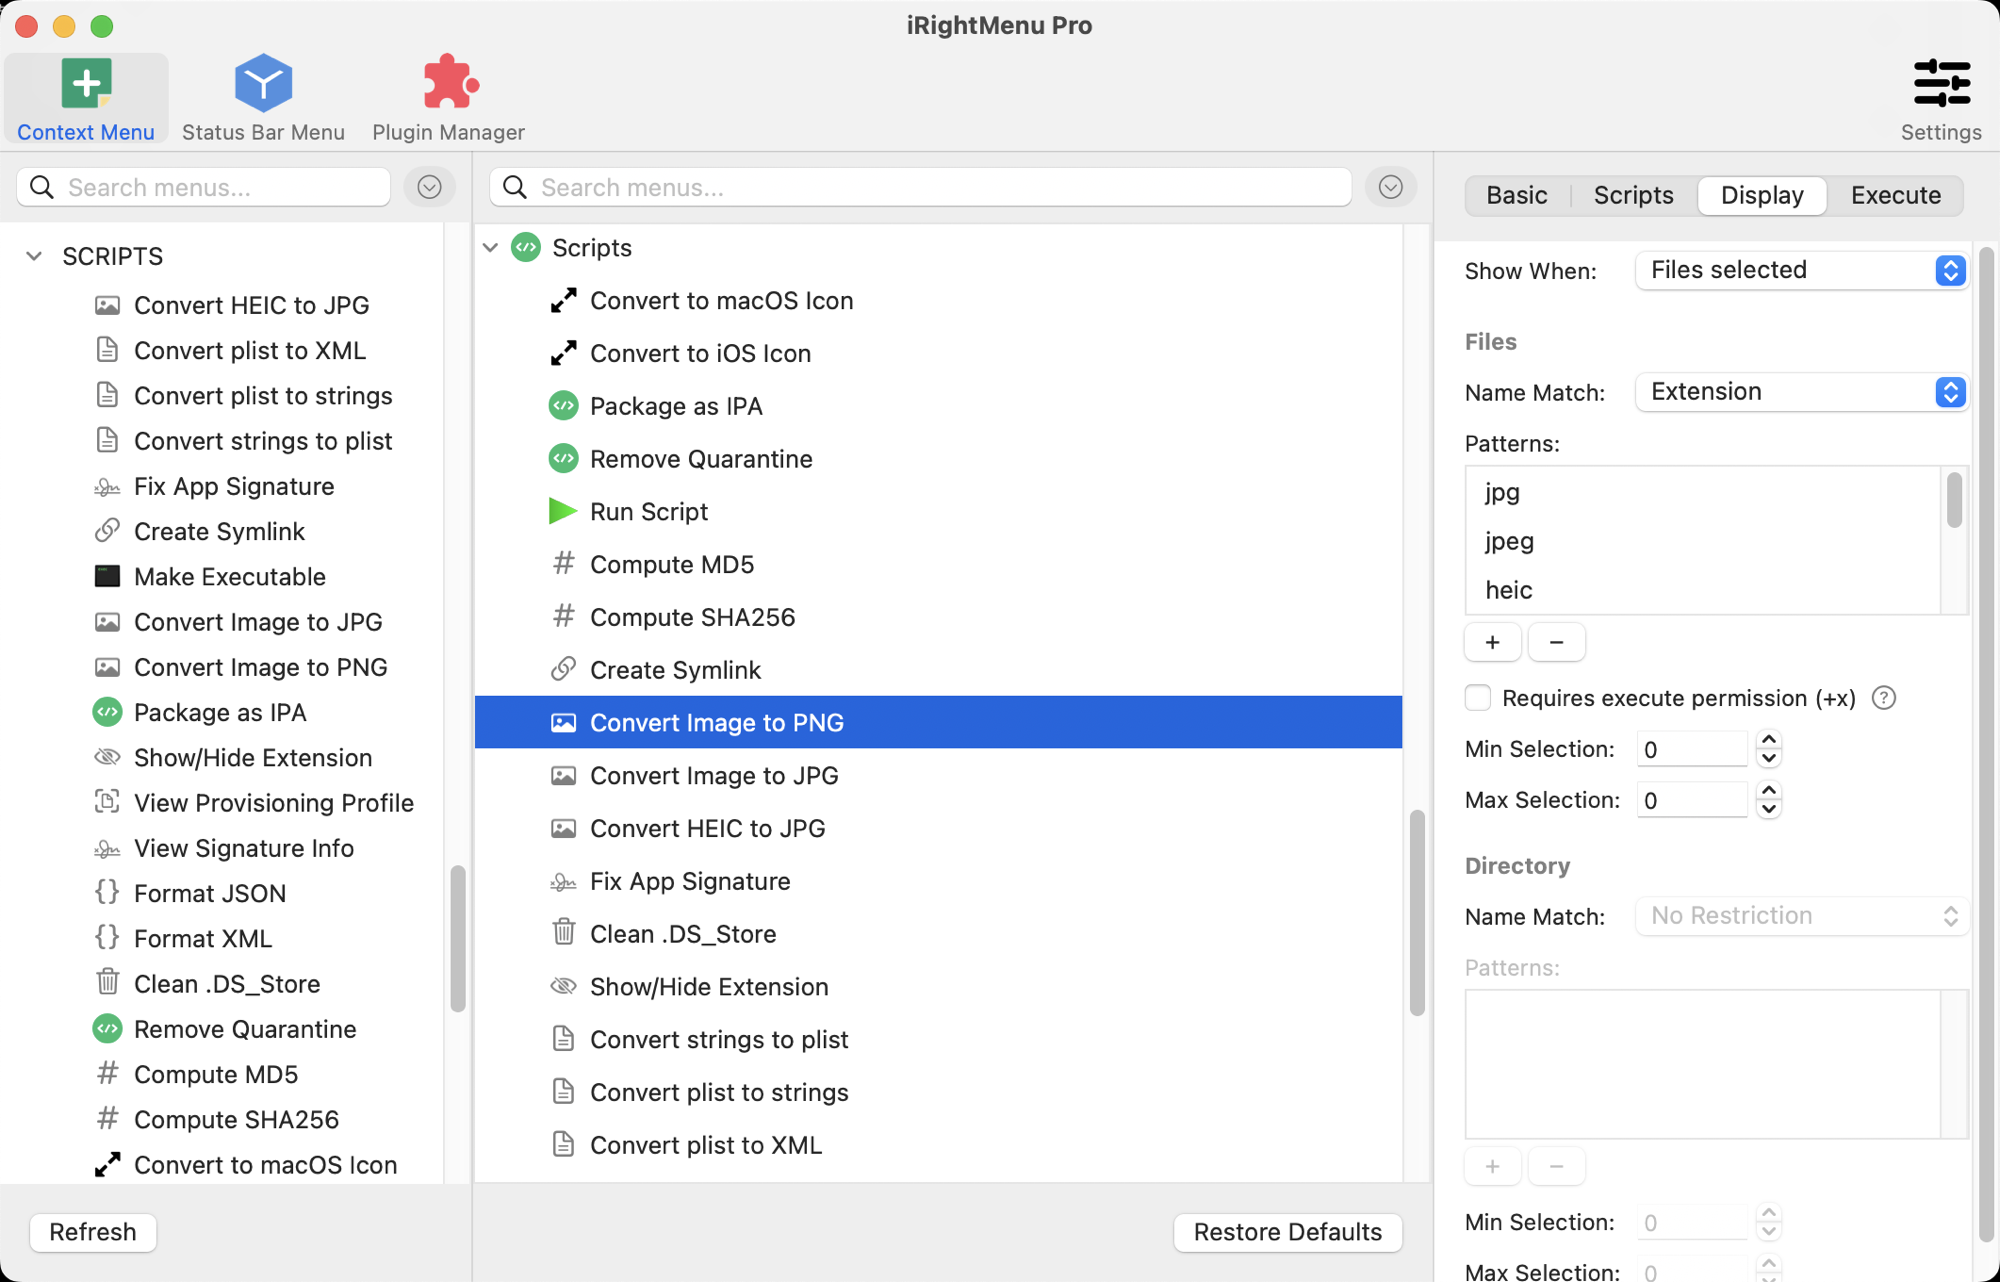
When Show When is “Files selected”, the whole Directory section is disabled: Show When is the master switch, and conditions on the side you did not select would have no effect, so the interface greys them out rather than let you fill them in for nothing.
Execute
| Field | Notes |
|---|---|
| Privilege | See below |
| Require Confirmation | Prompts before every run. Use it for anything destructive or irreversible |
| Notify | None / System Notification / Show Result |
| Play Sound | Plays a sound when finished; pick the effect on the right (Glass by default) |
Privilege:
| Option | Behaviour |
|---|---|
| Normal User | Runs as you. This is what you want almost every time |
| Administrator | Runs as root; you are asked for an administrator password once |
| Ask Each Time | Prompts on every run so you can choose. Scripts type only |
Notify:
| Option | Behaviour |
|---|---|
| None | Runs silently |
| System Notification | Posts a notification when finished |
| Show Result | Shows the script’s output in a dialog. Scripts type only — other types have no output to show |
Three more checkboxes live on this tab, each only for one type:
| Field | Appears for |
|---|---|
| Open After Create | New File |
| Open each file separately | Open With |
| Reveal in Finder | Copy To / Move To |
5. Display rules cheat sheet
| What you want | Show When | Everything else |
|---|---|---|
| Available everywhere, including empty space | Always | — |
| Images only | Files selected | Name Match = Extension: jpg png gif heic webp |
| A single file only | Files selected | Min 1, Max 1 |
| Several files (batch operations) | Files selected | Min 2 |
| Folders only | Folders selected | — |
| Xcode projects only | Folders selected | Name Match = Extension: xcodeproj |
| Executables only | Files selected | Check “Requires execute permission (+x)” |
| Files starting with IMG_ | Files selected | Name Match = Regular Expression: ^IMG_ |
| Both files and folders | Files or folders selected | — |
Archives, .tar.gz included |
Files selected | Name Match = Regular Expression: \.(zip\|rar\|7z\|tar\.gz)$ |
6. How the Status Bar Menu differs
The Status Bar Menu editor looks the same but differs in three ways:
1. There is no Display tab. The status bar menu opens from the menu bar icon, where there is no “selected file”, so file and folder conditions are meaningless. The inspector has only Basic and Execute (plus Scripts for script items).
2. There is a Shortcut field, under UI Configuration on the Basic tab. Click it, press a combination, and that shortcut runs the item directly without opening the menu.
3. The library only lists groups that do not depend on a selection — Favorites and Plugins. New File, Open With, Copy To and the rest only make sense with files selected, so they are not offered here.
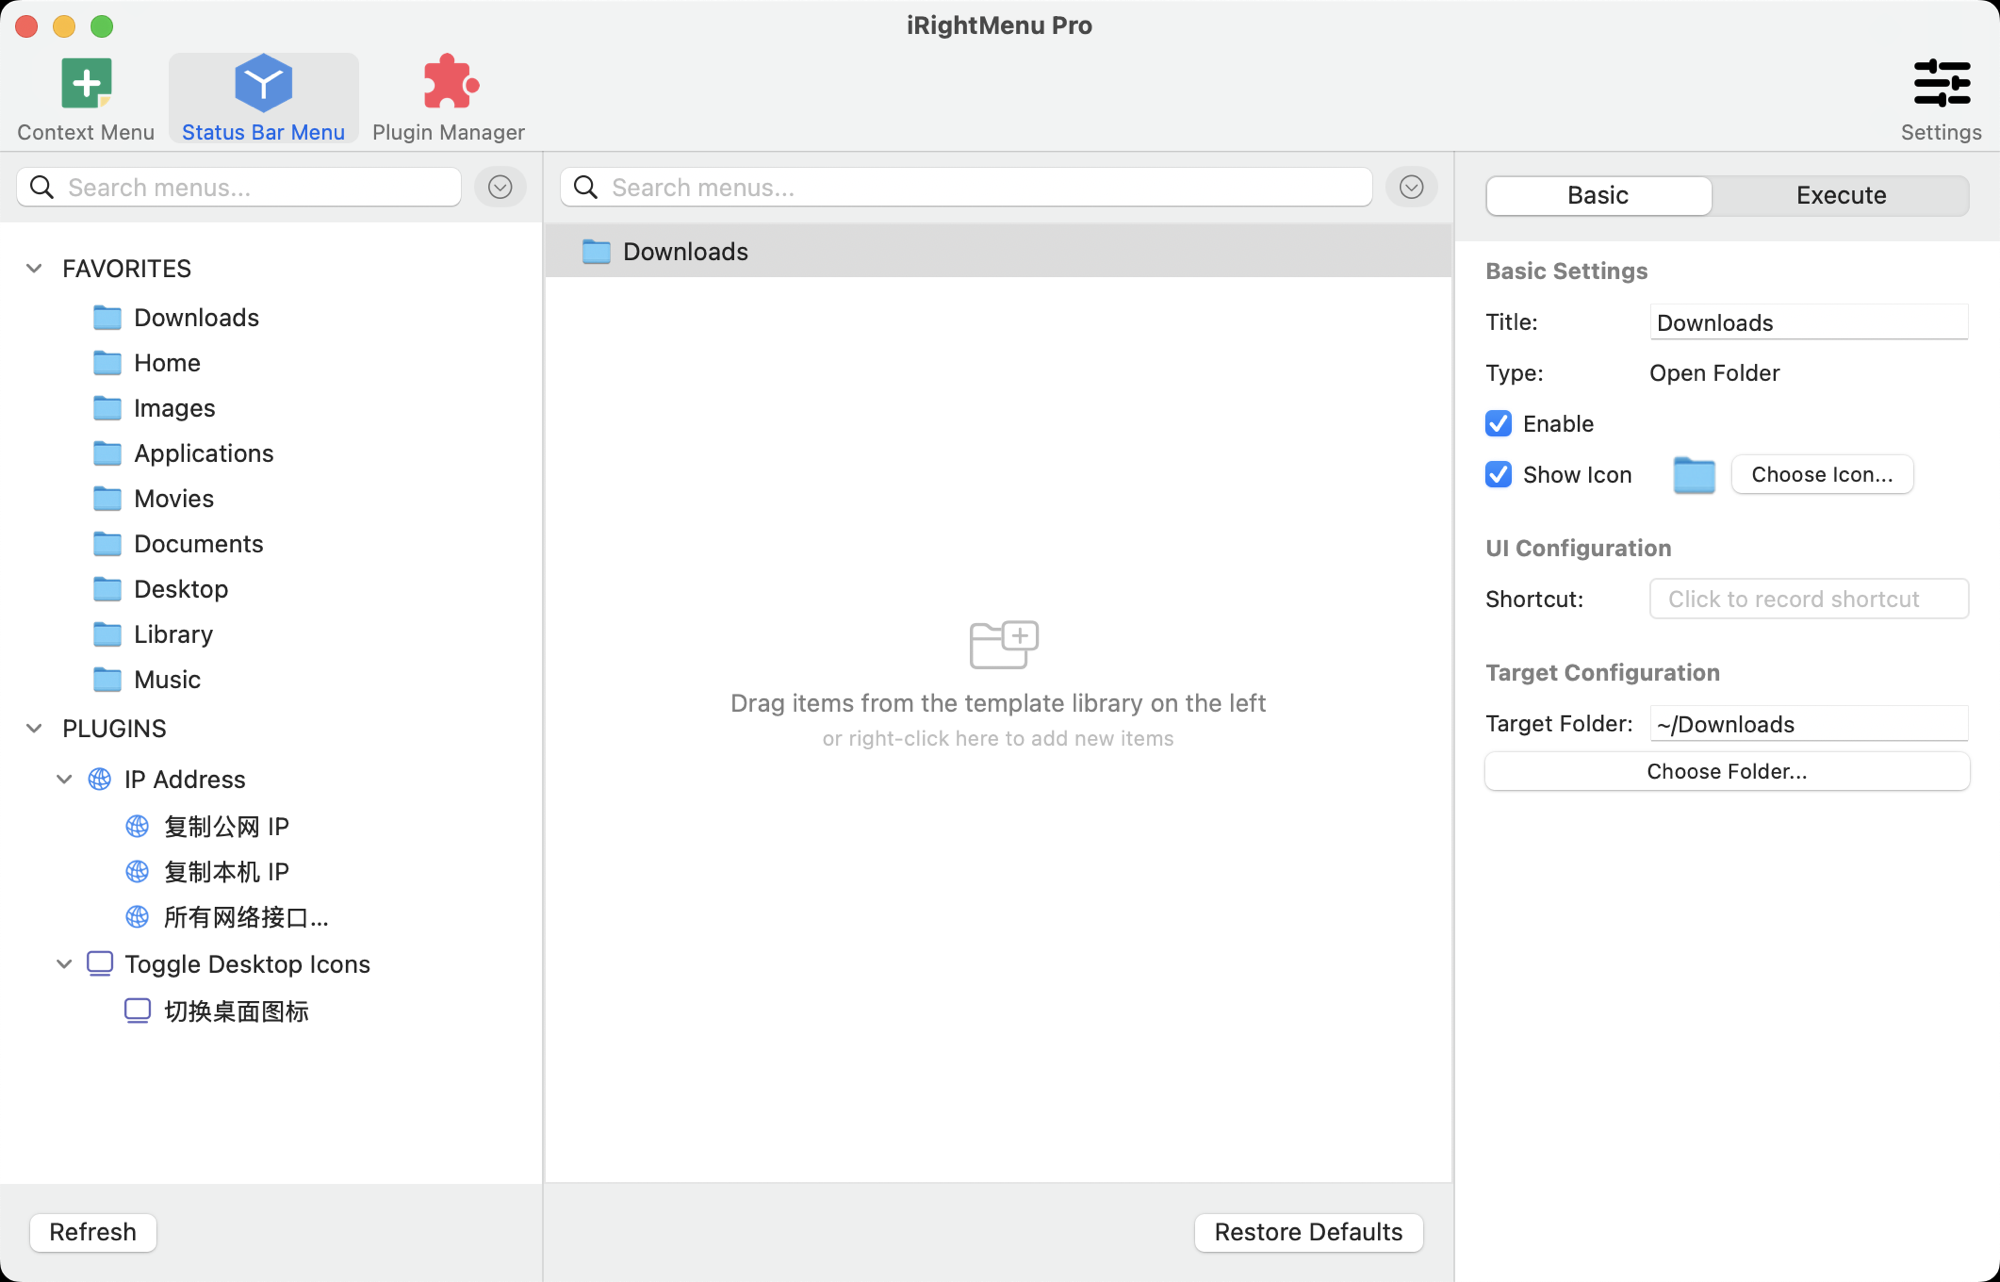
To put a script in the status bar, the library will not help — right-click in the middle pane → Add → Scripts. The right-click Add menu is not filtered and offers all eight types.
Note that a script here cannot read $1: there is no selection when a status bar menu runs.
7. Recipes
Batch-convert selected images to PNG
Type: Scripts
- Show When: Files selected
- Name Match: Extension →
jpgjpegheicwebp - Interpreter:
bash - Script Content:
  for f in "$@"; do
      sips -s format png "$f" --out "${f%.*}.png"
  done
- Notify: System Notification
Open a terminal in the current folder
Type: Scripts
- Show When: Always
- Script Content:
open -a Terminal "$PWD"
Stash the selection in an inbox folder
Type: Move To
- Show When: Files or folders selected
- Target Folder: your staging directory
- Check Reveal in Finder
Checksum a single large file
Type: Scripts
- Show When: Files selected
- Min 1, Max 1
- Script Content:
shasum -a 256 "$1" | pbcopy - Notify: System Notification
Edit a system config as administrator
Type: Scripts
- Show When: Files selected
- Privilege: Administrator
- Check Require Confirmation
- Script Content as needed
8. Restoring defaults, and what to check when something is wrong
Restore Defaults
Restore Defaults at the bottom of the middle pane only touches built-in menus:
- Built-in menus you deleted come back
- Built-in menus you changed (renamed, reordered, reconfigured) are reset to factory values
- Everything you added yourself, your own scripts, and plugin menus are left untouched
You are asked to confirm first. Afterwards the undo history is cleared — the items those entries pointed at have been rebuilt, so ⌘Z can no longer bring them back.
The change had no effect
- Check that Enable is on
- Check that Show When matches what you actually have selected — by far the most common cause is “Files selected” while right-clicking empty space
- Check the patterns under Name Match
- Still stuck? See the FAQ
Too many menus to find anything
Group them into submenus, or turn Enable off for the ones you rarely use — the configuration stays, ready to switch back on.